キャンピングカーのリアバンパー側面割れ/欠損箇所を復元修理
2023年6月14日
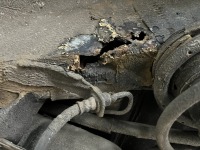
大掛かりの板金塗装作業を進めているキャンピングカーですが、引き続き、リアバンパーの修理作業を行います。リアバンパーはFRP製で、右側面が割れており、一部欠損している箇所もあります。

まずは、ベルトサンダーで割れ箇所の塗装を削ります。

欠損した部分を復元するため、裏側からFRP繊維を貼り付けて、樹脂を流し込み、板金パテを付けます。

板金パテを研ぎ、中間パテを付けて整形します。

修理したのは右側面だけですが、塗装は全面塗装しますので、リアバンパー全面を足付けします。脱脂をしてから、サフェーサーを重ね塗りします。

車体への仮合わせを行い、組み付けや形状などに問題は無いか?を確認します。しっかりと決まりましたので、車体から外して、塗装します。

仕上げのクリア塗装にて、リアバンパーの修理は完了です。

引き続き作業が進み次第、続きをアップします。